- If the subfloor is concrete, install the recommended water barrier to ensure that the Nucore panels don’t absorb moisture from below. You need a six-millimeter poly film moisture barrier.
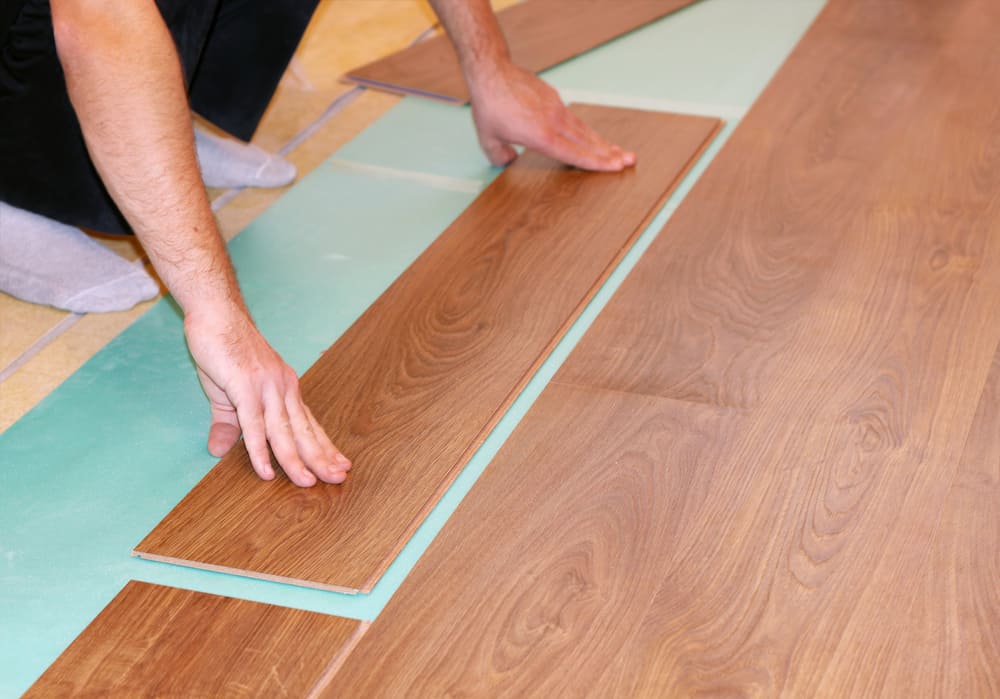
- Starting in a corner on the left-hand side of the room (as seen when you look down the length of the room after entering), place the long tongue end of the first Nucore tile against the wall.
- Use ¼ inch spacers to separate the tile from the wall. This gap is critical and allows the Nucore floor to expand and contract with any weather changes.
- From above, at an approximately 30-degree angle, slip the start of the second tile into the end of the first, and lay it down flat. It should click into place with ease.
- Using the rubber mallet, tap the end joint (where the two tiles meet) to ensure a secure connection.
- If you’ve not yet done so, add the ¼ inch spacers for the second tile. You can place the rest of the spacers for the first row before you continue.
- Repeat steps seven and eight until you reach the last tile. In most cases, you won’t be able to install a full tile at the end of the first row.
- Use the measuring tape to determine how long the final tile must be (remember to factor in the ½ inch expansion gap).
- Mark the Nucore board at the appropriate length, using the ruler and pencil. You can also use a fine tip permanent marker. If you decide to use a permanent marker, turn the board over to the right or left and mark the underside. Never turn the tile over lengthwise, because you’ll change the direction, and not be able to click the appropriate side into place.
- Using the laminate cutter or your choice of saw, cut the board on the marking you just made.
If you plan on installing multiple Nucore floating floors, you might want to invest in a laminate cutter. It’s essentially a guillotine for laminate and engineered boards. There’s a lot less room for error than with an electronic saw, and you can get one for as little as $25. - Follow steps seven and eight to install the last tile of the first row.
- Measure what’s left of the tile you cut earlier. You need a tile of at least 12 inches to start your second row. Staggered rows are an essential part of Nucore engineering and a critical requirement during installation.
- If your tile is long enough, use the same 30-degree installation approach to clip its tongue into the groove of the first tile on row one. Lay the tile down flat.
- If your tile is too short, cut a different tile in half, and use one half to begin the second row.
- Slip your tapping block into place on the side of your newly installed tile, and tap it with the mallet. This will ensure optimal adhesion between the first two rows. If the start of your tile isn’t flush with the wall, you can move the tapping block to the board’s short end and tap it gently into place.
- Follow steps seven and eight to lay the rest of the boards in the second row. Remember to tap each tile with the tapping block and mallet to ensure it bonds with the first row.
- Choose the staggering pattern you’d like to use. Most people use random or stepped staggering. I’ll discuss different staggering patterns later.
- Following your chosen stagger pattern, keep installing the next row in the series.
- When you reach the final row, you’ll probably find a gap that’s considerably narrower than the width of your boards. Place a loose board over the gap. Place a second plank on top of the first, with the tongue facing the wall.
- Draw a line to mark the board where you need to cut it. Repeat this step till you have enough planks for the final row.
- Install the row that you’ve just cut.
- Remove all the spacers.
- Installing your molding, rounding, or cornices over the floor to complete the look and hide the expansion gap.
Types of Staggering
There are multiple staggering patterns for you to choose from, and using an appropriate style can make your room look even better. You can continue starting one row with a full board and the next with a half board, but I don’t recommend it. Using this type of pattern can prevent the boards from appropriate expansion and contraction. This is only mildly better than having no stagger. Avoid any kind of stagger that results in an H pattern.- Random staggering is relatively common and means removing segments of undefined lengths from the first board on each row. The resulting pattern is entirely unplanned. Random staggers provide a unique look but can also be time-consuming.
- Stepped staggering is a rhythmic stagger that takes a calculated shape. This type of staggering originates with traditional hardwood flooring and is my preferred method.
- Before you start laying the floor, you choose a specific increment by which each row increases. Let’s say you choose 12 inches.
- The first whole tile in row one will be flush with the wall.
- You’ll cut a tile for the second row and insert a 12-inch segment before the first whole board.
- On the third row, you’ll install a 24-inch section before the first whole tile.
- The fourth row will feature a 36-inch section.
- Since Nucore tiles are typically just short of 48 inches long, the fifth row will feature two whole tiles at the start.
- From the sixth row onward, you’ll repeat the process, starting with a new 12-inch segment.
- The resulting floor will look like a series of staggered steps and create a geometric work of art.

Captain’s Notice: In more extended rooms, you can enhance the staggered look. When you reach the peak of your first series of steps (formed by the long tiles), repeat the stagger you used on the previous row. Continue moving backward and imitating the row that came before the last row you copied. In the end, you’ll have a beautiful stagger that seems to come from both directions.
- As you gain experience, you can combine different forms of staggering to create whichever pattern you like. Avoid having seams running in a straight line or staggers of less than six inches.
Where Can I Buy Nucore Flooring?
The Nucore brand of flooring is exclusively available at Floor & Decor stores nationwide. Since they’re in over 100 locations, you should be able to find a store near you. They also ship products, so if you’re not near a store, you can order online.
It’s worth noting that the stores can take two to five business days to get your order ready. When planning your installation date, remember to factor this in.
Is Nucore Flooring Good?
Nucore floors are an excellent option for most homes and small businesses. Their affordability and easy installation make them appealing. The hardwood or stone look and the fact that they’re genuinely waterproof only add to their appeal.
While you can install Nucore products in bathrooms, the manufacturers don’t recommend it.Due to the high levels of condensation, water vapor may make its way to the subfloor, andaffect the cork backing negatively.
With that one exception, these products are fantastic for almost every indoor use imaginable.
Can You Steam Mop Nucore Flooring?
According to Floor & Decor, you can clean Nucore floors in almost any way. You can sweep them, vacuum them, mop them or steam mop them.
I wouldn’t recommend steam mopping regularly, as the warranty cautions against exposing the products to regular condensation. As we all know, hot steam on a cold floor equals condensation.
Who Makes Nucore Flooring?
Nucore flooring products are designed in the United States and manufactured in China. Floor & Decor is responsible for both the creation and sale of these products.
Is Nucore Flooring Toxic?
All Nucore products have a GreenGuard gold certification. GreenGuard measures the volatile organic compound (VOC) levels of different flooring types.
Nucore classifies as a low-VOC flooring product. It has some minor off-gassing but too little to cause health problems or concerns.
Do You Need Underlayment for Nucore Flooring?
Although each tile has a cork backing, you need underlayment to keep the floor in place.
Failure to use an underlayment beneath your Nucore installation will void your warranty.
Using an unapproved underlayment may also void your warranty. If you’d like to learn more about different types of underlayment you can read our underlayment guide.
If you’re installing these products on a concrete subfloor, you also need to install a moisture barrier. Nucore recommends a 6mm poly film.
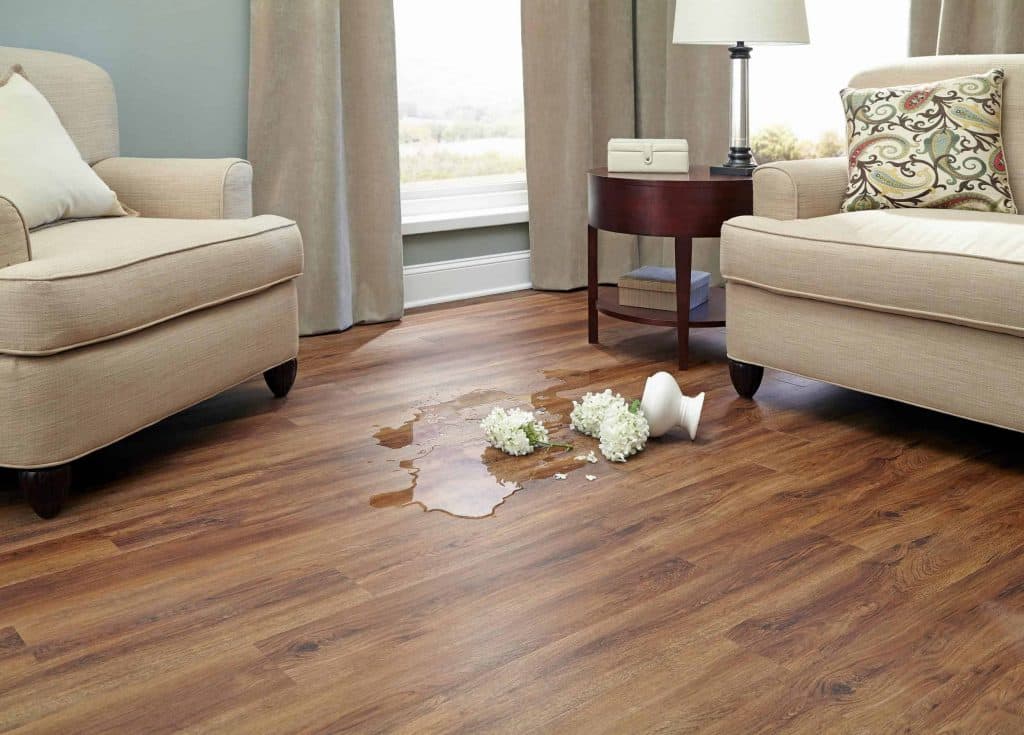
Is Nucore Flooring Waterproof?
These floors are 100% waterproof.
They have a rigid waterproof core that prevents liquids from leaking through. If water leaks through from below the subfloor, there’s still a risk of water damage unless you install the recommended waterproof barrier.
Still not sure if Nucore is for you? Perhaps you like the idea but want to see other options. Check out my guide to the easiest to install luxury vinyl planks.If you found this article valuable, you may also have use for my brand reviews of other luxury types of vinyl. If you’d like to consider other simple possibilities besides vinyl, look at my recommendations for the easiest DIY flooring options.
Your Installation Toolbox
Before you start your Nucore installation, you need the following:- Spacing wedges – Used to create an adequate gap between the wall and floor
- Rubber mallet – Helps to tap boards into place. Never use a metal hammer or mallet
- Tapping block – Prevents damage to the boards when you tap them into place
- Saw or laminate cutter – Essential for cutting end boards. Laminate cutters, jigsaws, and oscillating saws are the best options.
- Tape measure – Used for marking the end boards
- Ruler – Critical tool for making straight lines before cutting
- Pencil or marker – Useful for marking tiles you need to cut
- Personal protective equipment – Protects you and your clothing during installation
- Eye goggles
- Knee pads
- Dust mask
The Installation Process Step by Step
- Wear your protective gear to keep you safe during the process.
- Sweep, mop, or vacuum the subfloor to ensure that it’s dust-free. If you decide to mop, allow the floor ample time to dry before this step and the next.
- Check that the subfloor is level and dry. If the subfloor isn’t level, hire a professional to make corrections before you proceed.
Captain’s Notice: If your subfloor isn’t level before installing the Nucore, it will void your warranty. This also applies if you don’t dry and clean the subfloor before the installation. Use only the recommended underlayment and moisture barrier.
- If the subfloor is concrete, install the recommended water barrier to ensure that the Nucore panels don’t absorb moisture from below. You need a six-millimeter poly film moisture barrier.
- Starting in a corner on the left-hand side of the room (as seen when you look down the length of the room after entering), place the long tongue end of the first Nucore tile against the wall.
- Use ¼ inch spacers to separate the tile from the wall. This gap is critical and allows the Nucore floor to expand and contract with any weather changes.
- From above, at an approximately 30-degree angle, slip the start of the second tile into the end of the first, and lay it down flat. It should click into place with ease.
- Using the rubber mallet, tap the end joint (where the two tiles meet) to ensure a secure connection.
- If you’ve not yet done so, add the ¼ inch spacers for the second tile. You can place the rest of the spacers for the first row before you continue.
- Repeat steps seven and eight until you reach the last tile. In most cases, you won’t be able to install a full tile at the end of the first row.
- Use the measuring tape to determine how long the final tile must be (remember to factor in the ½ inch expansion gap).
- Mark the Nucore board at the appropriate length, using the ruler and pencil. You can also use a fine tip permanent marker. If you decide to use a permanent marker, turn the board over to the right or left and mark the underside. Never turn the tile over lengthwise, because you’ll change the direction, and not be able to click the appropriate side into place.
- Using the laminate cutter or your choice of saw, cut the board on the marking you just made.
If you plan on installing multiple Nucore floating floors, you might want to invest in a laminate cutter. It’s essentially a guillotine for laminate and engineered boards. There’s a lot less room for error than with an electronic saw, and you can get one for as little as $25. - Follow steps seven and eight to install the last tile of the first row.
- Measure what’s left of the tile you cut earlier. You need a tile of at least 12 inches to start your second row. Staggered rows are an essential part of Nucore engineering and a critical requirement during installation.
- If your tile is long enough, use the same 30-degree installation approach to clip its tongue into the groove of the first tile on row one. Lay the tile down flat.
- If your tile is too short, cut a different tile in half, and use one half to begin the second row.
- Slip your tapping block into place on the side of your newly installed tile, and tap it with the mallet. This will ensure optimal adhesion between the first two rows. If the start of your tile isn’t flush with the wall, you can move the tapping block to the board’s short end and tap it gently into place.
- Follow steps seven and eight to lay the rest of the boards in the second row. Remember to tap each tile with the tapping block and mallet to ensure it bonds with the first row.
- Choose the staggering pattern you’d like to use. Most people use random or stepped staggering. I’ll discuss different staggering patterns later.
- Following your chosen stagger pattern, keep installing the next row in the series.
- When you reach the final row, you’ll probably find a gap that’s considerably narrower than the width of your boards. Place a loose board over the gap. Place a second plank on top of the first, with the tongue facing the wall.
- Draw a line to mark the board where you need to cut it. Repeat this step till you have enough planks for the final row.
- Install the row that you’ve just cut.
- Remove all the spacers.
- Installing your molding, rounding, or cornices over the floor to complete the look and hide the expansion gap.
Types of Staggering
There are multiple staggering patterns for you to choose from, and using an appropriate style can make your room look even better. You can continue starting one row with a full board and the next with a half board, but I don’t recommend it. Using this type of pattern can prevent the boards from appropriate expansion and contraction. This is only mildly better than having no stagger. Avoid any kind of stagger that results in an H pattern.- Random staggering is relatively common and means removing segments of undefined lengths from the first board on each row. The resulting pattern is entirely unplanned. Random staggers provide a unique look but can also be time-consuming.
- Stepped staggering is a rhythmic stagger that takes a calculated shape. This type of staggering originates with traditional hardwood flooring and is my preferred method.
- Before you start laying the floor, you choose a specific increment by which each row increases. Let’s say you choose 12 inches.
- The first whole tile in row one will be flush with the wall.
- You’ll cut a tile for the second row and insert a 12-inch segment before the first whole board.
- On the third row, you’ll install a 24-inch section before the first whole tile.
- The fourth row will feature a 36-inch section.
- Since Nucore tiles are typically just short of 48 inches long, the fifth row will feature two whole tiles at the start.
- From the sixth row onward, you’ll repeat the process, starting with a new 12-inch segment.
- The resulting floor will look like a series of staggered steps and create a geometric work of art.
Captain’s Notice: In more extended rooms, you can enhance the staggered look. When you reach the peak of your first series of steps (formed by the long tiles), repeat the stagger you used on the previous row. Continue moving backward and imitating the row that came before the last row you copied. In the end, you’ll have a beautiful stagger that seems to come from both directions.
- As you gain experience, you can combine different forms of staggering to create whichever pattern you like. Avoid having seams running in a straight line or staggers of less than six inches.
Where Can I Buy Nucore Flooring?
The Nucore brand of flooring is exclusively available at Floor & Decor stores nationwide. Since they’re in over 100 locations, you should be able to find a store near you. They also ship products, so if you’re not near a store, you can order online.
It’s worth noting that the stores can take two to five business days to get your order ready. When planning your installation date, remember to factor this in.
Is Nucore Flooring Good?
Nucore floors are an excellent option for most homes and small businesses. Their affordability and easy installation make them appealing. The hardwood or stone look and the fact that they’re genuinely waterproof only add to their appeal.
While you can install Nucore products in bathrooms, the manufacturers don’t recommend it.Due to the high levels of condensation, water vapor may make its way to the subfloor, andaffect the cork backing negatively.
With that one exception, these products are fantastic for almost every indoor use imaginable.
Can You Steam Mop Nucore Flooring?
According to Floor & Decor, you can clean Nucore floors in almost any way. You can sweep them, vacuum them, mop them or steam mop them.
I wouldn’t recommend steam mopping regularly, as the warranty cautions against exposing the products to regular condensation. As we all know, hot steam on a cold floor equals condensation.
Who Makes Nucore Flooring?
Nucore flooring products are designed in the United States and manufactured in China. Floor & Decor is responsible for both the creation and sale of these products.
Is Nucore Flooring Toxic?
All Nucore products have a GreenGuard gold certification. GreenGuard measures the volatile organic compound (VOC) levels of different flooring types.
Nucore classifies as a low-VOC flooring product. It has some minor off-gassing but too little to cause health problems or concerns.
Do You Need Underlayment for Nucore Flooring?
Although each tile has a cork backing, you need underlayment to keep the floor in place.
Failure to use an underlayment beneath your Nucore installation will void your warranty.
Using an unapproved underlayment may also void your warranty. If you’d like to learn more about different types of underlayment you can read our underlayment guide.
If you’re installing these products on a concrete subfloor, you also need to install a moisture barrier. Nucore recommends a 6mm poly film.
Is Nucore Flooring Waterproof?
These floors are 100% waterproof.
They have a rigid waterproof core that prevents liquids from leaking through. If water leaks through from below the subfloor, there’s still a risk of water damage unless you install the recommended waterproof barrier.
Still not sure if Nucore is for you? Perhaps you like the idea but want to see other options. Check out my guide to the easiest to install luxury vinyl planks.If you found this article valuable, you may also have use for my brand reviews of other luxury types of vinyl. If you’d like to consider other simple possibilities besides vinyl, look at my recommendations for the easiest DIY flooring options.
Advantages
The primary advantage of Nucore vinyl planks is the ease of installation. The ingenious tongue-and-groove design makes it easy to click one row into the next. This makes it an ideal choice for DIY enthusiasts who like to do their own floor installs. Another significant advantage is its affordability. Nucore products have similar prices to other vinyl and laminate floorings. Considering that they look like hardwood flooring, Nucore tiles and boards offer a significantly cheaper alternative. Nucore products are also waterproof, which many other laminates aren’t. The waterproof core is in the center of the tiles, so the lower layers are still vulnerable to water damage. The upper layer, or wear layer, of these products undergoes extensive treatments. These applications provide stain, moisture, and microbe resistance. The backing undergoes treatments as well, but for mold and mildew resistance. Many laminates and floating floors lead to sounds echoing in a room because there’s an air pocket beneath them which amplifies sound. Since the Nucore backing consists of cork, it creates a sound barrier that helps break this “hollow” effect. These flooring products come with a limited lifetime warranty that covers certain damages. For the first year, the company will replace damaged floorboards if you meet the warranty requirements. From the end of the first year onwards, you’ll get a discount when buying replacements.Disadvantages
There are several disadvantages to the Nucore products, but the benefits outweigh them. The lifetime warranty is an excellent offer but has detailed requirements. For example, to keep the warranty intact:- You must use approved underlayments and moisture barriers.
- The subfloor must be 100% clean and dry before installation.
- You need to install the flooring according to their exact specifications.
- You’ve installed the flooring in a high-traffic area like a foyer or kitchen.
- The floor is in a room that experiences condensation regularly.
- Wear-through (such as loss of pattern) comprises an area less than two square inches.
Pros
- Easy to install
- Affordable alternative to hardwood
- Waterproof
- Mold and mildew resistant
- Sound resistant
Cons
- Many conditions to the limited lifetime warranty
- It can be hard to remove dirt from between tiles
- You can’t refurbish the tiles if the wear layer wears off
Installing a Nucore Floor
Installing this type of floating floor is a simple task. Below you’ll find all the tools and information you need for a basic installation.
Your Installation Toolbox
Before you start your Nucore installation, you need the following:- Spacing wedges – Used to create an adequate gap between the wall and floor
- Rubber mallet – Helps to tap boards into place. Never use a metal hammer or mallet
- Tapping block – Prevents damage to the boards when you tap them into place
- Saw or laminate cutter – Essential for cutting end boards. Laminate cutters, jigsaws, and oscillating saws are the best options.
- Tape measure – Used for marking the end boards
- Ruler – Critical tool for making straight lines before cutting
- Pencil or marker – Useful for marking tiles you need to cut
- Personal protective equipment – Protects you and your clothing during installation
- Eye goggles
- Knee pads
- Dust mask
The Installation Process Step by Step
- Wear your protective gear to keep you safe during the process.
- Sweep, mop, or vacuum the subfloor to ensure that it’s dust-free. If you decide to mop, allow the floor ample time to dry before this step and the next.
- Check that the subfloor is level and dry. If the subfloor isn’t level, hire a professional to make corrections before you proceed.
Captain’s Notice: If your subfloor isn’t level before installing the Nucore, it will void your warranty. This also applies if you don’t dry and clean the subfloor before the installation. Use only the recommended underlayment and moisture barrier.
- If the subfloor is concrete, install the recommended water barrier to ensure that the Nucore panels don’t absorb moisture from below. You need a six-millimeter poly film moisture barrier.
- Starting in a corner on the left-hand side of the room (as seen when you look down the length of the room after entering), place the long tongue end of the first Nucore tile against the wall.
- Use ¼ inch spacers to separate the tile from the wall. This gap is critical and allows the Nucore floor to expand and contract with any weather changes.
- From above, at an approximately 30-degree angle, slip the start of the second tile into the end of the first, and lay it down flat. It should click into place with ease.
- Using the rubber mallet, tap the end joint (where the two tiles meet) to ensure a secure connection.
- If you’ve not yet done so, add the ¼ inch spacers for the second tile. You can place the rest of the spacers for the first row before you continue.
- Repeat steps seven and eight until you reach the last tile. In most cases, you won’t be able to install a full tile at the end of the first row.
- Use the measuring tape to determine how long the final tile must be (remember to factor in the ½ inch expansion gap).
- Mark the Nucore board at the appropriate length, using the ruler and pencil. You can also use a fine tip permanent marker. If you decide to use a permanent marker, turn the board over to the right or left and mark the underside. Never turn the tile over lengthwise, because you’ll change the direction, and not be able to click the appropriate side into place.
- Using the laminate cutter or your choice of saw, cut the board on the marking you just made.
If you plan on installing multiple Nucore floating floors, you might want to invest in a laminate cutter. It’s essentially a guillotine for laminate and engineered boards. There’s a lot less room for error than with an electronic saw, and you can get one for as little as $25. - Follow steps seven and eight to install the last tile of the first row.
- Measure what’s left of the tile you cut earlier. You need a tile of at least 12 inches to start your second row. Staggered rows are an essential part of Nucore engineering and a critical requirement during installation.
- If your tile is long enough, use the same 30-degree installation approach to clip its tongue into the groove of the first tile on row one. Lay the tile down flat.
- If your tile is too short, cut a different tile in half, and use one half to begin the second row.
- Slip your tapping block into place on the side of your newly installed tile, and tap it with the mallet. This will ensure optimal adhesion between the first two rows. If the start of your tile isn’t flush with the wall, you can move the tapping block to the board’s short end and tap it gently into place.
- Follow steps seven and eight to lay the rest of the boards in the second row. Remember to tap each tile with the tapping block and mallet to ensure it bonds with the first row.
- Choose the staggering pattern you’d like to use. Most people use random or stepped staggering. I’ll discuss different staggering patterns later.
- Following your chosen stagger pattern, keep installing the next row in the series.
- When you reach the final row, you’ll probably find a gap that’s considerably narrower than the width of your boards. Place a loose board over the gap. Place a second plank on top of the first, with the tongue facing the wall.
- Draw a line to mark the board where you need to cut it. Repeat this step till you have enough planks for the final row.
- Install the row that you’ve just cut.
- Remove all the spacers.
- Installing your molding, rounding, or cornices over the floor to complete the look and hide the expansion gap.
Types of Staggering
There are multiple staggering patterns for you to choose from, and using an appropriate style can make your room look even better. You can continue starting one row with a full board and the next with a half board, but I don’t recommend it. Using this type of pattern can prevent the boards from appropriate expansion and contraction. This is only mildly better than having no stagger. Avoid any kind of stagger that results in an H pattern.- Random staggering is relatively common and means removing segments of undefined lengths from the first board on each row. The resulting pattern is entirely unplanned. Random staggers provide a unique look but can also be time-consuming.
- Stepped staggering is a rhythmic stagger that takes a calculated shape. This type of staggering originates with traditional hardwood flooring and is my preferred method.
- Before you start laying the floor, you choose a specific increment by which each row increases. Let’s say you choose 12 inches.
- The first whole tile in row one will be flush with the wall.
- You’ll cut a tile for the second row and insert a 12-inch segment before the first whole board.
- On the third row, you’ll install a 24-inch section before the first whole tile.
- The fourth row will feature a 36-inch section.
- Since Nucore tiles are typically just short of 48 inches long, the fifth row will feature two whole tiles at the start.
- From the sixth row onward, you’ll repeat the process, starting with a new 12-inch segment.
- The resulting floor will look like a series of staggered steps and create a geometric work of art.
Captain’s Notice: In more extended rooms, you can enhance the staggered look. When you reach the peak of your first series of steps (formed by the long tiles), repeat the stagger you used on the previous row. Continue moving backward and imitating the row that came before the last row you copied. In the end, you’ll have a beautiful stagger that seems to come from both directions.
- As you gain experience, you can combine different forms of staggering to create whichever pattern you like. Avoid having seams running in a straight line or staggers of less than six inches.
Where Can I Buy Nucore Flooring?
The Nucore brand of flooring is exclusively available at Floor & Decor stores nationwide. Since they’re in over 100 locations, you should be able to find a store near you. They also ship products, so if you’re not near a store, you can order online.
It’s worth noting that the stores can take two to five business days to get your order ready. When planning your installation date, remember to factor this in.
Is Nucore Flooring Good?
Nucore floors are an excellent option for most homes and small businesses. Their affordability and easy installation make them appealing. The hardwood or stone look and the fact that they’re genuinely waterproof only add to their appeal.
While you can install Nucore products in bathrooms, the manufacturers don’t recommend it.Due to the high levels of condensation, water vapor may make its way to the subfloor, andaffect the cork backing negatively.
With that one exception, these products are fantastic for almost every indoor use imaginable.
Can You Steam Mop Nucore Flooring?
According to Floor & Decor, you can clean Nucore floors in almost any way. You can sweep them, vacuum them, mop them or steam mop them.
I wouldn’t recommend steam mopping regularly, as the warranty cautions against exposing the products to regular condensation. As we all know, hot steam on a cold floor equals condensation.
Who Makes Nucore Flooring?
Nucore flooring products are designed in the United States and manufactured in China. Floor & Decor is responsible for both the creation and sale of these products.
Is Nucore Flooring Toxic?
All Nucore products have a GreenGuard gold certification. GreenGuard measures the volatile organic compound (VOC) levels of different flooring types.
Nucore classifies as a low-VOC flooring product. It has some minor off-gassing but too little to cause health problems or concerns.
Do You Need Underlayment for Nucore Flooring?
Although each tile has a cork backing, you need underlayment to keep the floor in place.
Failure to use an underlayment beneath your Nucore installation will void your warranty.
Using an unapproved underlayment may also void your warranty. If you’d like to learn more about different types of underlayment you can read our underlayment guide.
If you’re installing these products on a concrete subfloor, you also need to install a moisture barrier. Nucore recommends a 6mm poly film.
Is Nucore Flooring Waterproof?
These floors are 100% waterproof.
They have a rigid waterproof core that prevents liquids from leaking through. If water leaks through from below the subfloor, there’s still a risk of water damage unless you install the recommended waterproof barrier.
Still not sure if Nucore is for you? Perhaps you like the idea but want to see other options. Check out my guide to the easiest to install luxury vinyl planks.If you found this article valuable, you may also have use for my brand reviews of other luxury types of vinyl. If you’d like to consider other simple possibilities besides vinyl, look at my recommendations for the easiest DIY flooring options.
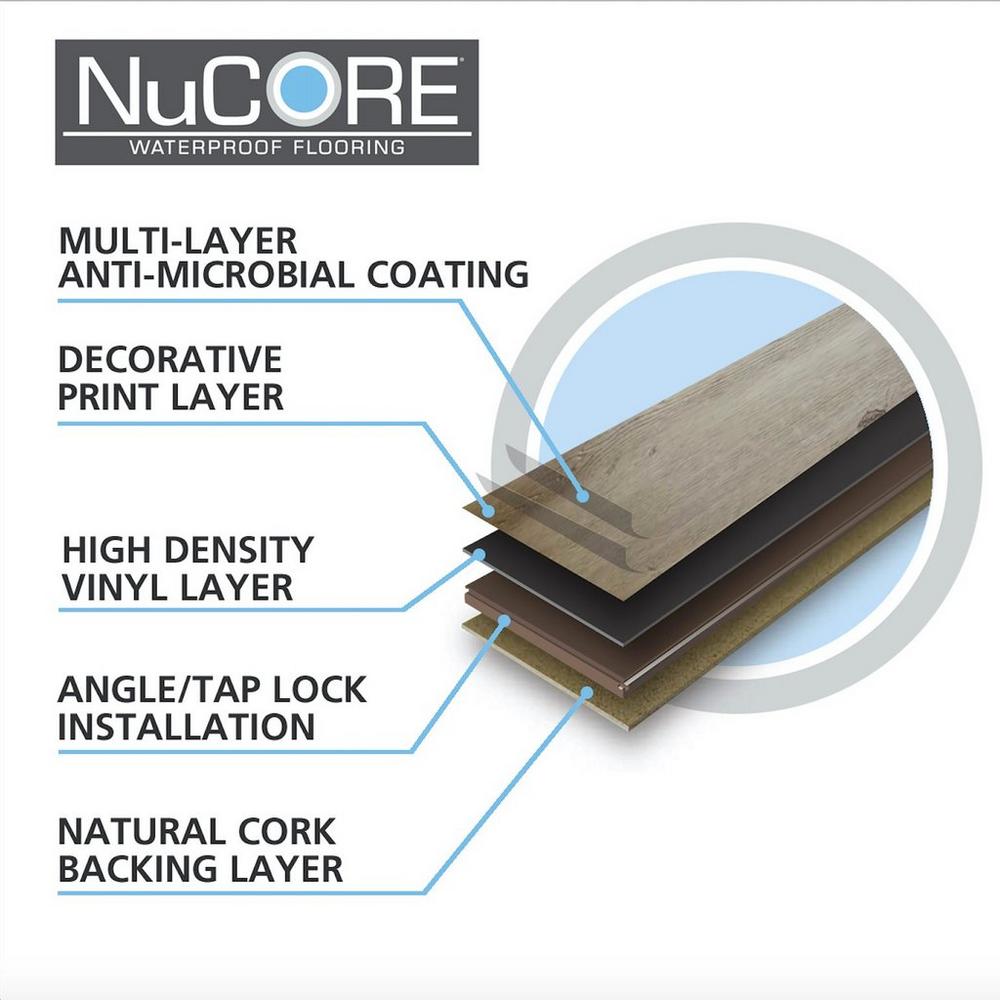
- Protective multi layer – Each vinyl plank has a surface layer that provides stain, moisture, and scratch resistance. They also treat it with an antimicrobial agent for the most hygienic floor possible.
- Decorative print layer – This layer gives the board its distinctive appearance. Vinyl is waterproof by nature, so it adds extra protection against water damage.
- The core vinyl layer – Each Nucore board has a rigid inner core which gives it sturdiness and maintains its shape. This is also the waterproof part of the design and prevents liquids from seeping into the backing and installation layers.
- Installation layer – The dense installation layer incorporates tongues on two sides and grooves on the others. Tongues from the first row glide into grooves on the second row for a perfect fit.
- The backing – Consisting of 100% cork, the Nucore backing is mold and mildew resistant. It also helps to muffle sounds and makes the planks softer to walk on. This part of the board is susceptible to water damage.
Available Finishes
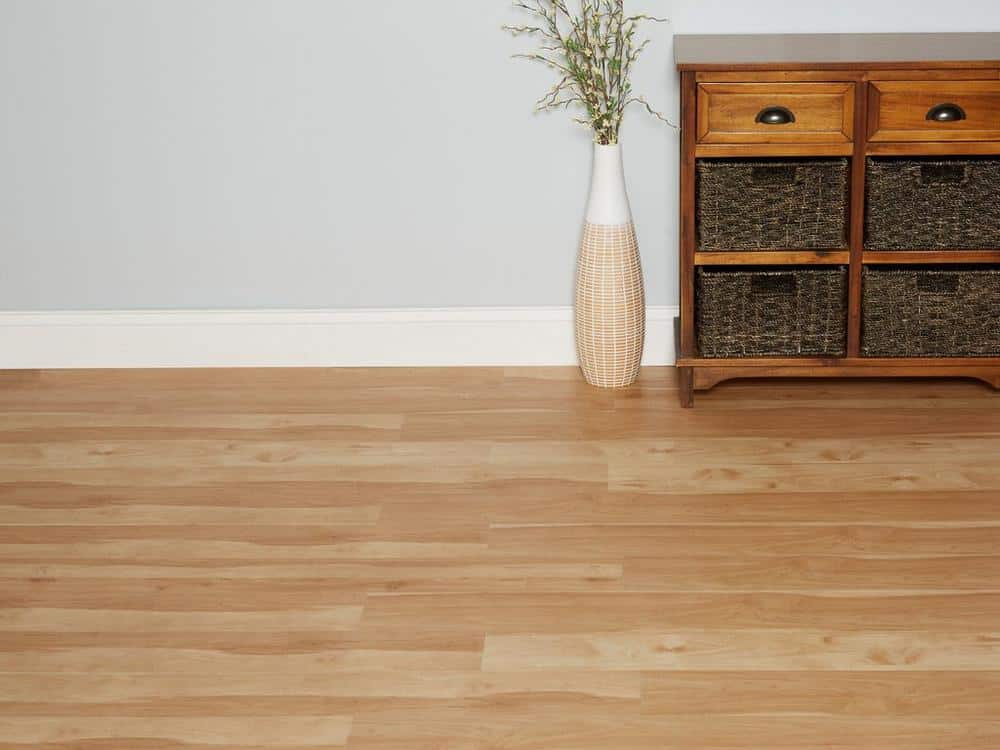
The Nucore flooring products are available in two main design styles. The first looks like stone, and the second looks like wood. The brand predominantly focuses on the wood look and specializes in hardwood lookalikes. Traditional hardwood flooring comes in hand-scraped and waxed finishes, among others. Given their wooden imitations, Nucore has endeavored to create multiple different finishes. Nucore has come up with five different finishes. These are:- Authentic texture – These products have an EIR-style finish. EIR, or “embossed in register”, products best resemble the texture of real wood. As part of the finish, the manufacturers emboss a wood grain pattern into the vinyl to increase the texture, depth, and authenticity of the look.
- Hand-scraped – This finish resembles hardwood floors finished by hand using traditional scraping techniques.
- High gloss – These boards have a much shinier appearance than the other finishes. They resemble finely sanded and varnished wood or waxed stone.
- Smooth – This is the least natural-looking of the Nucore finishes. A few different wood and stone-look planks fit this description, and they have a modern artificial look.
- Textured – Most Nucore vinyl planks fit this category. These products have a natural wood or stone look, without a varnished or waxed appearance.
Nucore Sizes
Nucore products come in several different widths and thicknesses. They generally hold to standard sizes but have expanded over time. Thickness – Most products are 6.5mm thick, but some products come in 5.5 or 8mm thicknesses. Width – Nucore planks come in a variety of widths:- Standard planks are between three and 5.99 inches wide.
- The wide plank has the most common width of six to 7.99 inches wide, depending on the product.
- Extra-wide planks are 8 inches wide or more.
- Other product widths include 12 by 24 inches and 16 by 32 inches.
Pricing
All the Nucore products vary between $2.49 and $4.29 per square foot. If you pay a professional to install the floor, it costs an average of $1.50 to $2.75 per square foot. At most, you’ll pay around $8 per square foot for the flooring and installation. You should also factor in the underlayment and moisture barrier for a total cost. The moisture barrier will add around $0.15 per square foot, and the underlayment will contribute another $0.50. In total, that means you’ll pay under $9 per square foot for the moisture barrier, underlayment, flooring, and installation. Please note: I calculated the above prices using the highest end of the price range. Full installation with all materials included can cost as little as $4.64 per square foot. If you do the installation yourself, that number comes down to roughly $3.15.
Pros and Cons of Nucore Vinyl Planks
Every type of flooring has pros and cons, as you can see in my guide to flooring options. I’ve listed the advantages and disadvantages in both detailed and shorthand formats.
Advantages
The primary advantage of Nucore vinyl planks is the ease of installation. The ingenious tongue-and-groove design makes it easy to click one row into the next. This makes it an ideal choice for DIY enthusiasts who like to do their own floor installs. Another significant advantage is its affordability. Nucore products have similar prices to other vinyl and laminate floorings. Considering that they look like hardwood flooring, Nucore tiles and boards offer a significantly cheaper alternative. Nucore products are also waterproof, which many other laminates aren’t. The waterproof core is in the center of the tiles, so the lower layers are still vulnerable to water damage. The upper layer, or wear layer, of these products undergoes extensive treatments. These applications provide stain, moisture, and microbe resistance. The backing undergoes treatments as well, but for mold and mildew resistance. Many laminates and floating floors lead to sounds echoing in a room because there’s an air pocket beneath them which amplifies sound. Since the Nucore backing consists of cork, it creates a sound barrier that helps break this “hollow” effect. These flooring products come with a limited lifetime warranty that covers certain damages. For the first year, the company will replace damaged floorboards if you meet the warranty requirements. From the end of the first year onwards, you’ll get a discount when buying replacements.Disadvantages
There are several disadvantages to the Nucore products, but the benefits outweigh them. The lifetime warranty is an excellent offer but has detailed requirements. For example, to keep the warranty intact:- You must use approved underlayments and moisture barriers.
- The subfloor must be 100% clean and dry before installation.
- You need to install the flooring according to their exact specifications.
- You’ve installed the flooring in a high-traffic area like a foyer or kitchen.
- The floor is in a room that experiences condensation regularly.
- Wear-through (such as loss of pattern) comprises an area less than two square inches.
Pros
- Easy to install
- Affordable alternative to hardwood
- Waterproof
- Mold and mildew resistant
- Sound resistant
Cons
- Many conditions to the limited lifetime warranty
- It can be hard to remove dirt from between tiles
- You can’t refurbish the tiles if the wear layer wears off
Installing a Nucore Floor
Installing this type of floating floor is a simple task. Below you’ll find all the tools and information you need for a basic installation.
Your Installation Toolbox
Before you start your Nucore installation, you need the following:- Spacing wedges – Used to create an adequate gap between the wall and floor
- Rubber mallet – Helps to tap boards into place. Never use a metal hammer or mallet
- Tapping block – Prevents damage to the boards when you tap them into place
- Saw or laminate cutter – Essential for cutting end boards. Laminate cutters, jigsaws, and oscillating saws are the best options.
- Tape measure – Used for marking the end boards
- Ruler – Critical tool for making straight lines before cutting
- Pencil or marker – Useful for marking tiles you need to cut
- Personal protective equipment – Protects you and your clothing during installation
- Eye goggles
- Knee pads
- Dust mask
The Installation Process Step by Step
- Wear your protective gear to keep you safe during the process.
- Sweep, mop, or vacuum the subfloor to ensure that it’s dust-free. If you decide to mop, allow the floor ample time to dry before this step and the next.
- Check that the subfloor is level and dry. If the subfloor isn’t level, hire a professional to make corrections before you proceed.
Captain’s Notice: If your subfloor isn’t level before installing the Nucore, it will void your warranty. This also applies if you don’t dry and clean the subfloor before the installation. Use only the recommended underlayment and moisture barrier.
- If the subfloor is concrete, install the recommended water barrier to ensure that the Nucore panels don’t absorb moisture from below. You need a six-millimeter poly film moisture barrier.
- Starting in a corner on the left-hand side of the room (as seen when you look down the length of the room after entering), place the long tongue end of the first Nucore tile against the wall.
- Use ¼ inch spacers to separate the tile from the wall. This gap is critical and allows the Nucore floor to expand and contract with any weather changes.
- From above, at an approximately 30-degree angle, slip the start of the second tile into the end of the first, and lay it down flat. It should click into place with ease.
- Using the rubber mallet, tap the end joint (where the two tiles meet) to ensure a secure connection.
- If you’ve not yet done so, add the ¼ inch spacers for the second tile. You can place the rest of the spacers for the first row before you continue.
- Repeat steps seven and eight until you reach the last tile. In most cases, you won’t be able to install a full tile at the end of the first row.
- Use the measuring tape to determine how long the final tile must be (remember to factor in the ½ inch expansion gap).
- Mark the Nucore board at the appropriate length, using the ruler and pencil. You can also use a fine tip permanent marker. If you decide to use a permanent marker, turn the board over to the right or left and mark the underside. Never turn the tile over lengthwise, because you’ll change the direction, and not be able to click the appropriate side into place.
- Using the laminate cutter or your choice of saw, cut the board on the marking you just made.
If you plan on installing multiple Nucore floating floors, you might want to invest in a laminate cutter. It’s essentially a guillotine for laminate and engineered boards. There’s a lot less room for error than with an electronic saw, and you can get one for as little as $25. - Follow steps seven and eight to install the last tile of the first row.
- Measure what’s left of the tile you cut earlier. You need a tile of at least 12 inches to start your second row. Staggered rows are an essential part of Nucore engineering and a critical requirement during installation.
- If your tile is long enough, use the same 30-degree installation approach to clip its tongue into the groove of the first tile on row one. Lay the tile down flat.
- If your tile is too short, cut a different tile in half, and use one half to begin the second row.
- Slip your tapping block into place on the side of your newly installed tile, and tap it with the mallet. This will ensure optimal adhesion between the first two rows. If the start of your tile isn’t flush with the wall, you can move the tapping block to the board’s short end and tap it gently into place.
- Follow steps seven and eight to lay the rest of the boards in the second row. Remember to tap each tile with the tapping block and mallet to ensure it bonds with the first row.
- Choose the staggering pattern you’d like to use. Most people use random or stepped staggering. I’ll discuss different staggering patterns later.
- Following your chosen stagger pattern, keep installing the next row in the series.
- When you reach the final row, you’ll probably find a gap that’s considerably narrower than the width of your boards. Place a loose board over the gap. Place a second plank on top of the first, with the tongue facing the wall.
- Draw a line to mark the board where you need to cut it. Repeat this step till you have enough planks for the final row.
- Install the row that you’ve just cut.
- Remove all the spacers.
- Installing your molding, rounding, or cornices over the floor to complete the look and hide the expansion gap.
Types of Staggering
There are multiple staggering patterns for you to choose from, and using an appropriate style can make your room look even better. You can continue starting one row with a full board and the next with a half board, but I don’t recommend it. Using this type of pattern can prevent the boards from appropriate expansion and contraction. This is only mildly better than having no stagger. Avoid any kind of stagger that results in an H pattern.- Random staggering is relatively common and means removing segments of undefined lengths from the first board on each row. The resulting pattern is entirely unplanned. Random staggers provide a unique look but can also be time-consuming.
- Stepped staggering is a rhythmic stagger that takes a calculated shape. This type of staggering originates with traditional hardwood flooring and is my preferred method.
- Before you start laying the floor, you choose a specific increment by which each row increases. Let’s say you choose 12 inches.
- The first whole tile in row one will be flush with the wall.
- You’ll cut a tile for the second row and insert a 12-inch segment before the first whole board.
- On the third row, you’ll install a 24-inch section before the first whole tile.
- The fourth row will feature a 36-inch section.
- Since Nucore tiles are typically just short of 48 inches long, the fifth row will feature two whole tiles at the start.
- From the sixth row onward, you’ll repeat the process, starting with a new 12-inch segment.
- The resulting floor will look like a series of staggered steps and create a geometric work of art.
Captain’s Notice: In more extended rooms, you can enhance the staggered look. When you reach the peak of your first series of steps (formed by the long tiles), repeat the stagger you used on the previous row. Continue moving backward and imitating the row that came before the last row you copied. In the end, you’ll have a beautiful stagger that seems to come from both directions.
- As you gain experience, you can combine different forms of staggering to create whichever pattern you like. Avoid having seams running in a straight line or staggers of less than six inches.
Where Can I Buy Nucore Flooring?
The Nucore brand of flooring is exclusively available at Floor & Decor stores nationwide. Since they’re in over 100 locations, you should be able to find a store near you. They also ship products, so if you’re not near a store, you can order online.
It’s worth noting that the stores can take two to five business days to get your order ready. When planning your installation date, remember to factor this in.
Is Nucore Flooring Good?
Nucore floors are an excellent option for most homes and small businesses. Their affordability and easy installation make them appealing. The hardwood or stone look and the fact that they’re genuinely waterproof only add to their appeal.
While you can install Nucore products in bathrooms, the manufacturers don’t recommend it.Due to the high levels of condensation, water vapor may make its way to the subfloor, andaffect the cork backing negatively.
With that one exception, these products are fantastic for almost every indoor use imaginable.
Can You Steam Mop Nucore Flooring?
According to Floor & Decor, you can clean Nucore floors in almost any way. You can sweep them, vacuum them, mop them or steam mop them.
I wouldn’t recommend steam mopping regularly, as the warranty cautions against exposing the products to regular condensation. As we all know, hot steam on a cold floor equals condensation.
Who Makes Nucore Flooring?
Nucore flooring products are designed in the United States and manufactured in China. Floor & Decor is responsible for both the creation and sale of these products.
Is Nucore Flooring Toxic?
All Nucore products have a GreenGuard gold certification. GreenGuard measures the volatile organic compound (VOC) levels of different flooring types.
Nucore classifies as a low-VOC flooring product. It has some minor off-gassing but too little to cause health problems or concerns.
Do You Need Underlayment for Nucore Flooring?
Although each tile has a cork backing, you need underlayment to keep the floor in place.
Failure to use an underlayment beneath your Nucore installation will void your warranty.
Using an unapproved underlayment may also void your warranty. If you’d like to learn more about different types of underlayment you can read our underlayment guide.
If you’re installing these products on a concrete subfloor, you also need to install a moisture barrier. Nucore recommends a 6mm poly film.
Is Nucore Flooring Waterproof?
These floors are 100% waterproof.
They have a rigid waterproof core that prevents liquids from leaking through. If water leaks through from below the subfloor, there’s still a risk of water damage unless you install the recommended waterproof barrier.
Still not sure if Nucore is for you? Perhaps you like the idea but want to see other options. Check out my guide to the easiest to install luxury vinyl planks.If you found this article valuable, you may also have use for my brand reviews of other luxury types of vinyl. If you’d like to consider other simple possibilities besides vinyl, look at my recommendations for the easiest DIY flooring options.
The Essential Truths
- Nucore vinyl planks are 100% waterproof.
- This flooring brand is only available from Floor & Decor stores nationwide.
- The tongue-and-groove design makes these floors easy to install.
- Nucore is an affordable alternative to traditional hardwood flooring.
- The floating installation saves time and money.
- These floors have a low-VHC (toxic gas emission) certification from GreenGuard.
- You need an underlayment when installing Nucore floorboards.
What Is Nucore Flooring?
Nucore flooring is a brand of patented vinyl plank for floating floor applications. Many people consider it laminate flooring due to its multiple layers. It’s also categorized as an engineered plank, thanks to its unique design.
The Design
Nucore products have a design that includes different layers with unique purposes. From the lowest layer to the topmost layer, they are as follows:- Protective multi layer – Each vinyl plank has a surface layer that provides stain, moisture, and scratch resistance. They also treat it with an antimicrobial agent for the most hygienic floor possible.
- Decorative print layer – This layer gives the board its distinctive appearance. Vinyl is waterproof by nature, so it adds extra protection against water damage.
- The core vinyl layer – Each Nucore board has a rigid inner core which gives it sturdiness and maintains its shape. This is also the waterproof part of the design and prevents liquids from seeping into the backing and installation layers.
- Installation layer – The dense installation layer incorporates tongues on two sides and grooves on the others. Tongues from the first row glide into grooves on the second row for a perfect fit.
- The backing – Consisting of 100% cork, the Nucore backing is mold and mildew resistant. It also helps to muffle sounds and makes the planks softer to walk on. This part of the board is susceptible to water damage.
Available Finishes
The Nucore flooring products are available in two main design styles. The first looks like stone, and the second looks like wood. The brand predominantly focuses on the wood look and specializes in hardwood lookalikes. Traditional hardwood flooring comes in hand-scraped and waxed finishes, among others. Given their wooden imitations, Nucore has endeavored to create multiple different finishes. Nucore has come up with five different finishes. These are:- Authentic texture – These products have an EIR-style finish. EIR, or “embossed in register”, products best resemble the texture of real wood. As part of the finish, the manufacturers emboss a wood grain pattern into the vinyl to increase the texture, depth, and authenticity of the look.
- Hand-scraped – This finish resembles hardwood floors finished by hand using traditional scraping techniques.
- High gloss – These boards have a much shinier appearance than the other finishes. They resemble finely sanded and varnished wood or waxed stone.
- Smooth – This is the least natural-looking of the Nucore finishes. A few different wood and stone-look planks fit this description, and they have a modern artificial look.
- Textured – Most Nucore vinyl planks fit this category. These products have a natural wood or stone look, without a varnished or waxed appearance.
Nucore Sizes
Nucore products come in several different widths and thicknesses. They generally hold to standard sizes but have expanded over time. Thickness – Most products are 6.5mm thick, but some products come in 5.5 or 8mm thicknesses. Width – Nucore planks come in a variety of widths:- Standard planks are between three and 5.99 inches wide.
- The wide plank has the most common width of six to 7.99 inches wide, depending on the product.
- Extra-wide planks are 8 inches wide or more.
- Other product widths include 12 by 24 inches and 16 by 32 inches.
Pricing
All the Nucore products vary between $2.49 and $4.29 per square foot. If you pay a professional to install the floor, it costs an average of $1.50 to $2.75 per square foot. At most, you’ll pay around $8 per square foot for the flooring and installation. You should also factor in the underlayment and moisture barrier for a total cost. The moisture barrier will add around $0.15 per square foot, and the underlayment will contribute another $0.50. In total, that means you’ll pay under $9 per square foot for the moisture barrier, underlayment, flooring, and installation. Please note: I calculated the above prices using the highest end of the price range. Full installation with all materials included can cost as little as $4.64 per square foot. If you do the installation yourself, that number comes down to roughly $3.15.
Pros and Cons of Nucore Vinyl Planks
Every type of flooring has pros and cons, as you can see in my guide to flooring options. I’ve listed the advantages and disadvantages in both detailed and shorthand formats.
Advantages
The primary advantage of Nucore vinyl planks is the ease of installation. The ingenious tongue-and-groove design makes it easy to click one row into the next. This makes it an ideal choice for DIY enthusiasts who like to do their own floor installs. Another significant advantage is its affordability. Nucore products have similar prices to other vinyl and laminate floorings. Considering that they look like hardwood flooring, Nucore tiles and boards offer a significantly cheaper alternative. Nucore products are also waterproof, which many other laminates aren’t. The waterproof core is in the center of the tiles, so the lower layers are still vulnerable to water damage. The upper layer, or wear layer, of these products undergoes extensive treatments. These applications provide stain, moisture, and microbe resistance. The backing undergoes treatments as well, but for mold and mildew resistance. Many laminates and floating floors lead to sounds echoing in a room because there’s an air pocket beneath them which amplifies sound. Since the Nucore backing consists of cork, it creates a sound barrier that helps break this “hollow” effect. These flooring products come with a limited lifetime warranty that covers certain damages. For the first year, the company will replace damaged floorboards if you meet the warranty requirements. From the end of the first year onwards, you’ll get a discount when buying replacements.Disadvantages
There are several disadvantages to the Nucore products, but the benefits outweigh them. The lifetime warranty is an excellent offer but has detailed requirements. For example, to keep the warranty intact:- You must use approved underlayments and moisture barriers.
- The subfloor must be 100% clean and dry before installation.
- You need to install the flooring according to their exact specifications.
- You’ve installed the flooring in a high-traffic area like a foyer or kitchen.
- The floor is in a room that experiences condensation regularly.
- Wear-through (such as loss of pattern) comprises an area less than two square inches.
Pros
- Easy to install
- Affordable alternative to hardwood
- Waterproof
- Mold and mildew resistant
- Sound resistant
Cons
- Many conditions to the limited lifetime warranty
- It can be hard to remove dirt from between tiles
- You can’t refurbish the tiles if the wear layer wears off
Installing a Nucore Floor
Installing this type of floating floor is a simple task. Below you’ll find all the tools and information you need for a basic installation.
Your Installation Toolbox
Before you start your Nucore installation, you need the following:- Spacing wedges – Used to create an adequate gap between the wall and floor
- Rubber mallet – Helps to tap boards into place. Never use a metal hammer or mallet
- Tapping block – Prevents damage to the boards when you tap them into place
- Saw or laminate cutter – Essential for cutting end boards. Laminate cutters, jigsaws, and oscillating saws are the best options.
- Tape measure – Used for marking the end boards
- Ruler – Critical tool for making straight lines before cutting
- Pencil or marker – Useful for marking tiles you need to cut
- Personal protective equipment – Protects you and your clothing during installation
- Eye goggles
- Knee pads
- Dust mask
The Installation Process Step by Step
- Wear your protective gear to keep you safe during the process.
- Sweep, mop, or vacuum the subfloor to ensure that it’s dust-free. If you decide to mop, allow the floor ample time to dry before this step and the next.
- Check that the subfloor is level and dry. If the subfloor isn’t level, hire a professional to make corrections before you proceed.
Captain’s Notice: If your subfloor isn’t level before installing the Nucore, it will void your warranty. This also applies if you don’t dry and clean the subfloor before the installation. Use only the recommended underlayment and moisture barrier.
- If the subfloor is concrete, install the recommended water barrier to ensure that the Nucore panels don’t absorb moisture from below. You need a six-millimeter poly film moisture barrier.
- Starting in a corner on the left-hand side of the room (as seen when you look down the length of the room after entering), place the long tongue end of the first Nucore tile against the wall.
- Use ¼ inch spacers to separate the tile from the wall. This gap is critical and allows the Nucore floor to expand and contract with any weather changes.
- From above, at an approximately 30-degree angle, slip the start of the second tile into the end of the first, and lay it down flat. It should click into place with ease.
- Using the rubber mallet, tap the end joint (where the two tiles meet) to ensure a secure connection.
- If you’ve not yet done so, add the ¼ inch spacers for the second tile. You can place the rest of the spacers for the first row before you continue.
- Repeat steps seven and eight until you reach the last tile. In most cases, you won’t be able to install a full tile at the end of the first row.
- Use the measuring tape to determine how long the final tile must be (remember to factor in the ½ inch expansion gap).
- Mark the Nucore board at the appropriate length, using the ruler and pencil. You can also use a fine tip permanent marker. If you decide to use a permanent marker, turn the board over to the right or left and mark the underside. Never turn the tile over lengthwise, because you’ll change the direction, and not be able to click the appropriate side into place.
- Using the laminate cutter or your choice of saw, cut the board on the marking you just made.
If you plan on installing multiple Nucore floating floors, you might want to invest in a laminate cutter. It’s essentially a guillotine for laminate and engineered boards. There’s a lot less room for error than with an electronic saw, and you can get one for as little as $25. - Follow steps seven and eight to install the last tile of the first row.
- Measure what’s left of the tile you cut earlier. You need a tile of at least 12 inches to start your second row. Staggered rows are an essential part of Nucore engineering and a critical requirement during installation.
- If your tile is long enough, use the same 30-degree installation approach to clip its tongue into the groove of the first tile on row one. Lay the tile down flat.
- If your tile is too short, cut a different tile in half, and use one half to begin the second row.
- Slip your tapping block into place on the side of your newly installed tile, and tap it with the mallet. This will ensure optimal adhesion between the first two rows. If the start of your tile isn’t flush with the wall, you can move the tapping block to the board’s short end and tap it gently into place.
- Follow steps seven and eight to lay the rest of the boards in the second row. Remember to tap each tile with the tapping block and mallet to ensure it bonds with the first row.
- Choose the staggering pattern you’d like to use. Most people use random or stepped staggering. I’ll discuss different staggering patterns later.
- Following your chosen stagger pattern, keep installing the next row in the series.
- When you reach the final row, you’ll probably find a gap that’s considerably narrower than the width of your boards. Place a loose board over the gap. Place a second plank on top of the first, with the tongue facing the wall.
- Draw a line to mark the board where you need to cut it. Repeat this step till you have enough planks for the final row.
- Install the row that you’ve just cut.
- Remove all the spacers.
- Installing your molding, rounding, or cornices over the floor to complete the look and hide the expansion gap.
Types of Staggering
There are multiple staggering patterns for you to choose from, and using an appropriate style can make your room look even better. You can continue starting one row with a full board and the next with a half board, but I don’t recommend it. Using this type of pattern can prevent the boards from appropriate expansion and contraction. This is only mildly better than having no stagger. Avoid any kind of stagger that results in an H pattern.- Random staggering is relatively common and means removing segments of undefined lengths from the first board on each row. The resulting pattern is entirely unplanned. Random staggers provide a unique look but can also be time-consuming.
- Stepped staggering is a rhythmic stagger that takes a calculated shape. This type of staggering originates with traditional hardwood flooring and is my preferred method.
- Before you start laying the floor, you choose a specific increment by which each row increases. Let’s say you choose 12 inches.
- The first whole tile in row one will be flush with the wall.
- You’ll cut a tile for the second row and insert a 12-inch segment before the first whole board.
- On the third row, you’ll install a 24-inch section before the first whole tile.
- The fourth row will feature a 36-inch section.
- Since Nucore tiles are typically just short of 48 inches long, the fifth row will feature two whole tiles at the start.
- From the sixth row onward, you’ll repeat the process, starting with a new 12-inch segment.
- The resulting floor will look like a series of staggered steps and create a geometric work of art.
Captain’s Notice: In more extended rooms, you can enhance the staggered look. When you reach the peak of your first series of steps (formed by the long tiles), repeat the stagger you used on the previous row. Continue moving backward and imitating the row that came before the last row you copied. In the end, you’ll have a beautiful stagger that seems to come from both directions.
- As you gain experience, you can combine different forms of staggering to create whichever pattern you like. Avoid having seams running in a straight line or staggers of less than six inches.
Where Can I Buy Nucore Flooring?
The Nucore brand of flooring is exclusively available at Floor & Decor stores nationwide. Since they’re in over 100 locations, you should be able to find a store near you. They also ship products, so if you’re not near a store, you can order online.
It’s worth noting that the stores can take two to five business days to get your order ready. When planning your installation date, remember to factor this in.
Is Nucore Flooring Good?
Nucore floors are an excellent option for most homes and small businesses. Their affordability and easy installation make them appealing. The hardwood or stone look and the fact that they’re genuinely waterproof only add to their appeal.
While you can install Nucore products in bathrooms, the manufacturers don’t recommend it.Due to the high levels of condensation, water vapor may make its way to the subfloor, andaffect the cork backing negatively.
With that one exception, these products are fantastic for almost every indoor use imaginable.
Can You Steam Mop Nucore Flooring?
According to Floor & Decor, you can clean Nucore floors in almost any way. You can sweep them, vacuum them, mop them or steam mop them.
I wouldn’t recommend steam mopping regularly, as the warranty cautions against exposing the products to regular condensation. As we all know, hot steam on a cold floor equals condensation.
Who Makes Nucore Flooring?
Nucore flooring products are designed in the United States and manufactured in China. Floor & Decor is responsible for both the creation and sale of these products.
Is Nucore Flooring Toxic?
All Nucore products have a GreenGuard gold certification. GreenGuard measures the volatile organic compound (VOC) levels of different flooring types.
Nucore classifies as a low-VOC flooring product. It has some minor off-gassing but too little to cause health problems or concerns.
Do You Need Underlayment for Nucore Flooring?
Although each tile has a cork backing, you need underlayment to keep the floor in place.
Failure to use an underlayment beneath your Nucore installation will void your warranty.
Using an unapproved underlayment may also void your warranty. If you’d like to learn more about different types of underlayment you can read our underlayment guide.
If you’re installing these products on a concrete subfloor, you also need to install a moisture barrier. Nucore recommends a 6mm poly film.
Is Nucore Flooring Waterproof?
These floors are 100% waterproof.
They have a rigid waterproof core that prevents liquids from leaking through. If water leaks through from below the subfloor, there’s still a risk of water damage unless you install the recommended waterproof barrier.
Still not sure if Nucore is for you? Perhaps you like the idea but want to see other options. Check out my guide to the easiest to install luxury vinyl planks.If you found this article valuable, you may also have use for my brand reviews of other luxury types of vinyl. If you’d like to consider other simple possibilities besides vinyl, look at my recommendations for the easiest DIY flooring options.
Nucore Flooring Buying Guide (Without a Sales Pitch!)
Nucore flooring is one of the few waterproof floating floors on the market and is rapidly gaining popularity. This engineered vinyl plank incorporates a hardwood look for the ultimate combination of appearance and affordability. Let me help you navigate the ins and outs of this unique flooring and show you what you need to know.
The Essential Truths
- Nucore vinyl planks are 100% waterproof.
- This flooring brand is only available from Floor & Decor stores nationwide.
- The tongue-and-groove design makes these floors easy to install.
- Nucore is an affordable alternative to traditional hardwood flooring.
- The floating installation saves time and money.
- These floors have a low-VHC (toxic gas emission) certification from GreenGuard.
- You need an underlayment when installing Nucore floorboards.
What Is Nucore Flooring?
Nucore flooring is a brand of patented vinyl plank for floating floor applications. Many people consider it laminate flooring due to its multiple layers. It’s also categorized as an engineered plank, thanks to its unique design.
The Design
Nucore products have a design that includes different layers with unique purposes. From the lowest layer to the topmost layer, they are as follows:- Protective multi layer – Each vinyl plank has a surface layer that provides stain, moisture, and scratch resistance. They also treat it with an antimicrobial agent for the most hygienic floor possible.
- Decorative print layer – This layer gives the board its distinctive appearance. Vinyl is waterproof by nature, so it adds extra protection against water damage.
- The core vinyl layer – Each Nucore board has a rigid inner core which gives it sturdiness and maintains its shape. This is also the waterproof part of the design and prevents liquids from seeping into the backing and installation layers.
- Installation layer – The dense installation layer incorporates tongues on two sides and grooves on the others. Tongues from the first row glide into grooves on the second row for a perfect fit.
- The backing – Consisting of 100% cork, the Nucore backing is mold and mildew resistant. It also helps to muffle sounds and makes the planks softer to walk on. This part of the board is susceptible to water damage.
Available Finishes
The Nucore flooring products are available in two main design styles. The first looks like stone, and the second looks like wood. The brand predominantly focuses on the wood look and specializes in hardwood lookalikes. Traditional hardwood flooring comes in hand-scraped and waxed finishes, among others. Given their wooden imitations, Nucore has endeavored to create multiple different finishes. Nucore has come up with five different finishes. These are:- Authentic texture – These products have an EIR-style finish. EIR, or “embossed in register”, products best resemble the texture of real wood. As part of the finish, the manufacturers emboss a wood grain pattern into the vinyl to increase the texture, depth, and authenticity of the look.
- Hand-scraped – This finish resembles hardwood floors finished by hand using traditional scraping techniques.
- High gloss – These boards have a much shinier appearance than the other finishes. They resemble finely sanded and varnished wood or waxed stone.
- Smooth – This is the least natural-looking of the Nucore finishes. A few different wood and stone-look planks fit this description, and they have a modern artificial look.
- Textured – Most Nucore vinyl planks fit this category. These products have a natural wood or stone look, without a varnished or waxed appearance.
Nucore Sizes
Nucore products come in several different widths and thicknesses. They generally hold to standard sizes but have expanded over time. Thickness – Most products are 6.5mm thick, but some products come in 5.5 or 8mm thicknesses. Width – Nucore planks come in a variety of widths:- Standard planks are between three and 5.99 inches wide.
- The wide plank has the most common width of six to 7.99 inches wide, depending on the product.
- Extra-wide planks are 8 inches wide or more.
- Other product widths include 12 by 24 inches and 16 by 32 inches.
Pricing
All the Nucore products vary between $2.49 and $4.29 per square foot. If you pay a professional to install the floor, it costs an average of $1.50 to $2.75 per square foot. At most, you’ll pay around $8 per square foot for the flooring and installation. You should also factor in the underlayment and moisture barrier for a total cost. The moisture barrier will add around $0.15 per square foot, and the underlayment will contribute another $0.50. In total, that means you’ll pay under $9 per square foot for the moisture barrier, underlayment, flooring, and installation. Please note: I calculated the above prices using the highest end of the price range. Full installation with all materials included can cost as little as $4.64 per square foot. If you do the installation yourself, that number comes down to roughly $3.15.
Pros and Cons of Nucore Vinyl Planks
Every type of flooring has pros and cons, as you can see in my guide to flooring options. I’ve listed the advantages and disadvantages in both detailed and shorthand formats.
Advantages
The primary advantage of Nucore vinyl planks is the ease of installation. The ingenious tongue-and-groove design makes it easy to click one row into the next. This makes it an ideal choice for DIY enthusiasts who like to do their own floor installs. Another significant advantage is its affordability. Nucore products have similar prices to other vinyl and laminate floorings. Considering that they look like hardwood flooring, Nucore tiles and boards offer a significantly cheaper alternative. Nucore products are also waterproof, which many other laminates aren’t. The waterproof core is in the center of the tiles, so the lower layers are still vulnerable to water damage. The upper layer, or wear layer, of these products undergoes extensive treatments. These applications provide stain, moisture, and microbe resistance. The backing undergoes treatments as well, but for mold and mildew resistance. Many laminates and floating floors lead to sounds echoing in a room because there’s an air pocket beneath them which amplifies sound. Since the Nucore backing consists of cork, it creates a sound barrier that helps break this “hollow” effect. These flooring products come with a limited lifetime warranty that covers certain damages. For the first year, the company will replace damaged floorboards if you meet the warranty requirements. From the end of the first year onwards, you’ll get a discount when buying replacements.Disadvantages
There are several disadvantages to the Nucore products, but the benefits outweigh them. The lifetime warranty is an excellent offer but has detailed requirements. For example, to keep the warranty intact:- You must use approved underlayments and moisture barriers.
- The subfloor must be 100% clean and dry before installation.
- You need to install the flooring according to their exact specifications.
- You’ve installed the flooring in a high-traffic area like a foyer or kitchen.
- The floor is in a room that experiences condensation regularly.
- Wear-through (such as loss of pattern) comprises an area less than two square inches.
Pros
- Easy to install
- Affordable alternative to hardwood
- Waterproof
- Mold and mildew resistant
- Sound resistant
Cons
- Many conditions to the limited lifetime warranty
- It can be hard to remove dirt from between tiles
- You can’t refurbish the tiles if the wear layer wears off
Installing a Nucore Floor
Installing this type of floating floor is a simple task. Below you’ll find all the tools and information you need for a basic installation.
Your Installation Toolbox
Before you start your Nucore installation, you need the following:- Spacing wedges – Used to create an adequate gap between the wall and floor
- Rubber mallet – Helps to tap boards into place. Never use a metal hammer or mallet
- Tapping block – Prevents damage to the boards when you tap them into place
- Saw or laminate cutter – Essential for cutting end boards. Laminate cutters, jigsaws, and oscillating saws are the best options.
- Tape measure – Used for marking the end boards
- Ruler – Critical tool for making straight lines before cutting
- Pencil or marker – Useful for marking tiles you need to cut
- Personal protective equipment – Protects you and your clothing during installation
- Eye goggles
- Knee pads
- Dust mask
The Installation Process Step by Step
- Wear your protective gear to keep you safe during the process.
- Sweep, mop, or vacuum the subfloor to ensure that it’s dust-free. If you decide to mop, allow the floor ample time to dry before this step and the next.
- Check that the subfloor is level and dry. If the subfloor isn’t level, hire a professional to make corrections before you proceed.
Captain’s Notice: If your subfloor isn’t level before installing the Nucore, it will void your warranty. This also applies if you don’t dry and clean the subfloor before the installation. Use only the recommended underlayment and moisture barrier.
- If the subfloor is concrete, install the recommended water barrier to ensure that the Nucore panels don’t absorb moisture from below. You need a six-millimeter poly film moisture barrier.
- Starting in a corner on the left-hand side of the room (as seen when you look down the length of the room after entering), place the long tongue end of the first Nucore tile against the wall.
- Use ¼ inch spacers to separate the tile from the wall. This gap is critical and allows the Nucore floor to expand and contract with any weather changes.
- From above, at an approximately 30-degree angle, slip the start of the second tile into the end of the first, and lay it down flat. It should click into place with ease.
- Using the rubber mallet, tap the end joint (where the two tiles meet) to ensure a secure connection.
- If you’ve not yet done so, add the ¼ inch spacers for the second tile. You can place the rest of the spacers for the first row before you continue.
- Repeat steps seven and eight until you reach the last tile. In most cases, you won’t be able to install a full tile at the end of the first row.
- Use the measuring tape to determine how long the final tile must be (remember to factor in the ½ inch expansion gap).
- Mark the Nucore board at the appropriate length, using the ruler and pencil. You can also use a fine tip permanent marker. If you decide to use a permanent marker, turn the board over to the right or left and mark the underside. Never turn the tile over lengthwise, because you’ll change the direction, and not be able to click the appropriate side into place.
- Using the laminate cutter or your choice of saw, cut the board on the marking you just made.
If you plan on installing multiple Nucore floating floors, you might want to invest in a laminate cutter. It’s essentially a guillotine for laminate and engineered boards. There’s a lot less room for error than with an electronic saw, and you can get one for as little as $25. - Follow steps seven and eight to install the last tile of the first row.
- Measure what’s left of the tile you cut earlier. You need a tile of at least 12 inches to start your second row. Staggered rows are an essential part of Nucore engineering and a critical requirement during installation.
- If your tile is long enough, use the same 30-degree installation approach to clip its tongue into the groove of the first tile on row one. Lay the tile down flat.
- If your tile is too short, cut a different tile in half, and use one half to begin the second row.
- Slip your tapping block into place on the side of your newly installed tile, and tap it with the mallet. This will ensure optimal adhesion between the first two rows. If the start of your tile isn’t flush with the wall, you can move the tapping block to the board’s short end and tap it gently into place.
- Follow steps seven and eight to lay the rest of the boards in the second row. Remember to tap each tile with the tapping block and mallet to ensure it bonds with the first row.
- Choose the staggering pattern you’d like to use. Most people use random or stepped staggering. I’ll discuss different staggering patterns later.
- Following your chosen stagger pattern, keep installing the next row in the series.
- When you reach the final row, you’ll probably find a gap that’s considerably narrower than the width of your boards. Place a loose board over the gap. Place a second plank on top of the first, with the tongue facing the wall.
- Draw a line to mark the board where you need to cut it. Repeat this step till you have enough planks for the final row.
- Install the row that you’ve just cut.
- Remove all the spacers.
- Installing your molding, rounding, or cornices over the floor to complete the look and hide the expansion gap.
Types of Staggering
There are multiple staggering patterns for you to choose from, and using an appropriate style can make your room look even better. You can continue starting one row with a full board and the next with a half board, but I don’t recommend it. Using this type of pattern can prevent the boards from appropriate expansion and contraction. This is only mildly better than having no stagger. Avoid any kind of stagger that results in an H pattern.- Random staggering is relatively common and means removing segments of undefined lengths from the first board on each row. The resulting pattern is entirely unplanned. Random staggers provide a unique look but can also be time-consuming.
- Stepped staggering is a rhythmic stagger that takes a calculated shape. This type of staggering originates with traditional hardwood flooring and is my preferred method.
- Before you start laying the floor, you choose a specific increment by which each row increases. Let’s say you choose 12 inches.
- The first whole tile in row one will be flush with the wall.
- You’ll cut a tile for the second row and insert a 12-inch segment before the first whole board.
- On the third row, you’ll install a 24-inch section before the first whole tile.
- The fourth row will feature a 36-inch section.
- Since Nucore tiles are typically just short of 48 inches long, the fifth row will feature two whole tiles at the start.
- From the sixth row onward, you’ll repeat the process, starting with a new 12-inch segment.
- The resulting floor will look like a series of staggered steps and create a geometric work of art.
Captain’s Notice: In more extended rooms, you can enhance the staggered look. When you reach the peak of your first series of steps (formed by the long tiles), repeat the stagger you used on the previous row. Continue moving backward and imitating the row that came before the last row you copied. In the end, you’ll have a beautiful stagger that seems to come from both directions.
- As you gain experience, you can combine different forms of staggering to create whichever pattern you like. Avoid having seams running in a straight line or staggers of less than six inches.
Where Can I Buy Nucore Flooring?
The Nucore brand of flooring is exclusively available at Floor & Decor stores nationwide. Since they’re in over 100 locations, you should be able to find a store near you. They also ship products, so if you’re not near a store, you can order online.
It’s worth noting that the stores can take two to five business days to get your order ready. When planning your installation date, remember to factor this in.
Is Nucore Flooring Good?
Nucore floors are an excellent option for most homes and small businesses. Their affordability and easy installation make them appealing. The hardwood or stone look and the fact that they’re genuinely waterproof only add to their appeal.
While you can install Nucore products in bathrooms, the manufacturers don’t recommend it.Due to the high levels of condensation, water vapor may make its way to the subfloor, andaffect the cork backing negatively.
With that one exception, these products are fantastic for almost every indoor use imaginable.
Can You Steam Mop Nucore Flooring?
According to Floor & Decor, you can clean Nucore floors in almost any way. You can sweep them, vacuum them, mop them or steam mop them.
I wouldn’t recommend steam mopping regularly, as the warranty cautions against exposing the products to regular condensation. As we all know, hot steam on a cold floor equals condensation.
Who Makes Nucore Flooring?
Nucore flooring products are designed in the United States and manufactured in China. Floor & Decor is responsible for both the creation and sale of these products.
Is Nucore Flooring Toxic?
All Nucore products have a GreenGuard gold certification. GreenGuard measures the volatile organic compound (VOC) levels of different flooring types.
Nucore classifies as a low-VOC flooring product. It has some minor off-gassing but too little to cause health problems or concerns.
Do You Need Underlayment for Nucore Flooring?
Although each tile has a cork backing, you need underlayment to keep the floor in place.
Failure to use an underlayment beneath your Nucore installation will void your warranty.
Using an unapproved underlayment may also void your warranty. If you’d like to learn more about different types of underlayment you can read our underlayment guide.
If you’re installing these products on a concrete subfloor, you also need to install a moisture barrier. Nucore recommends a 6mm poly film.
Is Nucore Flooring Waterproof?
These floors are 100% waterproof.
They have a rigid waterproof core that prevents liquids from leaking through. If water leaks through from below the subfloor, there’s still a risk of water damage unless you install the recommended waterproof barrier.
Still not sure if Nucore is for you? Perhaps you like the idea but want to see other options. Check out my guide to the easiest to install luxury vinyl planks.If you found this article valuable, you may also have use for my brand reviews of other luxury types of vinyl. If you’d like to consider other simple possibilities besides vinyl, look at my recommendations for the easiest DIY flooring options.

Ran in to several problems installing Nucore plank flooring with cracking/breaking during install. First time I went with manufactory directions. Second time sales person sold underlayment to the customer that wanted underlayment installed. Here we’re the job went south, during the install I had multiple problems with locking the length and width of the planks. Upon doing a test area later in the day with NO underlayment the pieces went to as the first floor I laid with no hitches of damage. I fill the underlayment gives to much flex when locking the pieces causing the fractures/breaks. Also fill this could end up with call backs for fractures down the road, so included a clause in my finial invoice the underlayment is not recommended for the product. Point loads i.e. chair legs or heavy furniture items carrying a lot of weight could fracture the pieces. Also found several other installer having issues with the same problems both on line and in person!